
CAMP integration cannot be fully activated until you are prepared to use FL3XX as your primary means of logging hours and cycles, as these will be synced to CAMP.
However, there are preparatory steps that can be completed beforehand!
Prerequisites for full activation:
- Aircraft profiles created in Aircraft module
- Identification of your initialization date and a record of total hours and cycles as of that initialization date (see below).
Preparatory Steps (before the day of activation):
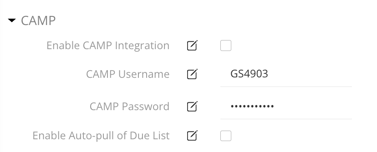
Credentials and Settings
- Contact CAMP (your dedicated contact or support@campsystems.com) and state your intention to integrate with FL3XX.
- Request an API username and API password (special credentials for the sole purpose of this integration).
- Provide a list of tails you intend to enable for this integration and ask that CAMP manages the settings and "sets the flags" for these aircraft. Note: If you add more aircraft to FL3XX in the future, you will likely need to request that CAMP also enable them in this way.
- Enter the username and password you received into Settings → Integrations → CAMP. SAVE.
Initializing Aircraft
Navigate to the Aircraft module in FL3XX and review the Maintenance → Log section of one of your aircraft. Decide upon an initialization date for each tail.
The initialization date is a dividing line:
- You will report the total sums of hours and cycles that occurred before initialization to FL3XX (Initial column).
- FL3XX will log hours and cycles from post-flights that occur after initialization and report them to you (Reported column).
- Adding these together, an accurate total is maintained (Total column).
It is best if there are no flights on the initialization date, to make it clear on which side of the line each flight falls. You should be confident that all flights that occur after this date will be input into FL3XX.
Flights in FL3XX that occurred before your initialization date will not be counted in the active Recorded log, even if the post-flights are verified. Those flights should be accounted for in your Initial column totals.
Values from flights that occur after your initialization date will log in under the Recorded column - but only once the post-flight is verified (post-flight status is marked OK - green)!
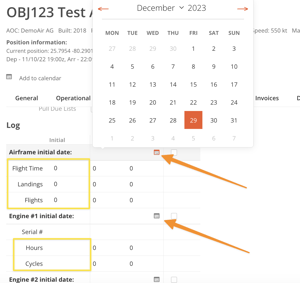
- Click the date picker for each component of the aircraft and select your initialization date.
- In the Initial column, report the total hours, cycles, etc. that the aircraft had logged as of the initialization date.
Note: Some operators do not log the number of Flights and leave the initial value at 0. This will not impact the CAMP integration. - Once all components' Initial values are complete, SAVE.
- Enter in the Serial number for each component. The serial numbers in FL3XX need to match the ones in CAMP exactly, including hyphens and capitalization. SAVE.
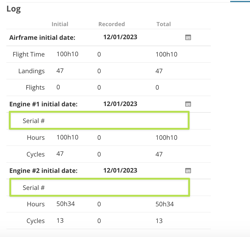
From here, you should be seeing accurate data in the Total column. Any flights that occur after the initialization date should be accounted for in the Recorded column.
Remember that flights' post-flights must be completed and verified in order to be recorded. Verified means the status of the post-flight panel is OK (green).
Once accurate logs are showing, you are ready to activate!
Activation Steps (on the day of activation):
- Go to Settings → Integrations → CAMP. Check the box next to Enable CAMP Integration. SAVE.
- In the Aircraft module, for each aircraft to be activated, go to the Maintenance → Common section. For Maintenance System, choose CAMP in the drop-down list. SAVE.
- In Aircraft → Maintenance → Log, check the Sync checkbox next to each component.
Oftentimes it show Error at first - but after waiting a moment and refreshing the page, it will resolve to OK. If an Error persists, reach out to FL3XX Onboarding or FL3XX Support.
- Repeat the above steps for each aircraft you wish to activate.
You can now use the integration (and manage the other settings available - including the Pull Due List feature) per this guide: CAMP!