
- Discard changes
- ATC CTOT Messages
- Enhanced Conflict Resolution in the Crew App
- Managing Expenses in the Crew App
- Downloading flights for Offline and Airplane Mode
- Birthday Notifications
- Pax Previously Onboard Information
- Flight Release in Crew App
- Text Fields and the Bottom Sheet Editor
Discard Changes
The Discard Changes option lets you undo unsaved local edits to a flight before they are synced to the platform.
This is useful when you have edited one or more fields on a flight but want to start fresh without syncing those changes.
How to use:
- Edit one or more fields on a flight without syncing.
- Navigate back to the calendar or flight list.
- Swipe left on the flight. "Discard Changes" appears alongside Sync and Details.
- Tap Discard Changes.
- Confirm in the dialog: tap Discard to revert all edits, or Cancel to keep editing.
Key notes:
- The option is only visible when there are unsaved local changes. It does not appear on unchanged flights.
- Works in offline mode.
- Expenses are not included. Unsaved changes to expenses will continue to show the unsaved-changes indicator but cannot be discarded using this option.
- No operator setting required. Available to all users with flight access.
ATC CTOT Messages
Crew members can now view the latest ATC Calculated Take-Off Time (CTOT) messages directly within the Crew App’s MVT (Movement) tab. This update ensures that crew members stay informed about important air traffic control updates that could impact their flights.
This feature is exclusively accessible to customers utilizing PPS integrations.
How to Use the ATC CTOT Messages Feature
-
Access ATC CTOT Messages:
- Go to the MVT tab in the Crew App.
- If there is an ATC CTOT message available for your flight, you will see a new section labeled “ATC CTOT Messages.”
- This section displays only when there is a message to show.
-
View Message Details:
- The ATC CTOT message includes the “Last update” timestamp, displayed in UTC for consistency.
- You will see the content of the most recent ATC CTOT message, presented in an easy-to-read format within the departure airport section.
-
Receive Push Notifications:
- When a new ATC CTOT message is received, all crew members assigned to the flight (including both Flight Deck Crew and Cabin Crew) will get a push notification.
- The notification header will display the flight number, flight date, departure airport, and arrival airport.
- The message will read: “You have received a new ATC CTOT Message.”
-
Navigate to ATC CTOT Messages:
- Click on the notification to be automatically directed to the MVT tab, where the latest ATC CTOT message will be displayed.
- Click on the notification to be automatically directed to the MVT tab, where the latest ATC CTOT message will be displayed.
-jpeg.jpeg?width=300&height=649&name=Screenshot%202024-08-22%20at%2015-16-34%20(1)-jpeg.jpeg)
-PNG.png?width=300&height=649&name=IMG_0009%20(1)-PNG.png)
Key Benefits
- Stay Updated: Crew members can easily access the most recent ATC CTOT messages to stay informed of any air traffic control updates affecting their flights.
- Real-Time Alerts: Receive immediate notifications for any new messages, ensuring timely awareness of any changes or delays.
- Seamless Navigation: Direct access from push notifications to the relevant section in the Crew App.
Enhanced Conflict Resolution in the Crew App
We are excited to introduce an enhanced conflict resolution interface in the Crew app, designed to help you manage data synchronization conflicts more effectively. This feature ensures that you can clearly understand the impact of your changes and offers intuitive solutions to resolve any conflicts that arise.

Key Features:
- Three-Way Comparison: Easily compare conflicting data edits made by you and others.
- User-Friendly Interface: Select your preferred options for conflicting fields through an intuitive interface.
- Conflict Overview: View all conflicts on a single screen with options to "Cancel" or "Save" your choices.
- Automatic Selection: When selecting calculated fields, all related fields are automatically selected to prevent inconsistencies.
- Persistent Alerts: Receive clear alerts and messages to guide you through the conflict resolution process.
How It Works:
-
Conflict Detection:
- Conflicts are detected when syncing data online or after reconnecting and syncing changes.

- Conflicts are detected when syncing data online or after reconnecting and syncing changes.
-
Resolution Options:
- Choose between "Mine," "Theirs," or "Resolve Manually" when a conflict is detected.

- The "Resolve Manually" option allows you to compare and select the best data values.

- Choose between "Mine," "Theirs," or "Resolve Manually" when a conflict is detected.
-
One-Page Conflict Management:
- All conflicts are displayed on a separate screen for easy navigation and resolution.

- Ensure all conflicts are resolved before saving to maintain data integrity.

- All conflicts are displayed on a separate screen for easy navigation and resolution.
By providing clear visual feedback and a transparent process, this new feature helps you make informed decisions about which data to keep and which to discard, ensuring smooth and accurate data synchronization.
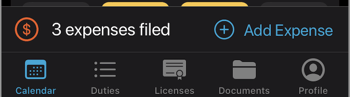
Managing Expenses in the Crew App
The FL3XX Crew App simplifies the management of expenses for flight crew members by providing an intuitive interface for adding and tracking expenses related to flights. Crew members can efficiently add, edit, and manage expenses directly from their mobile devices, ensuring seamless integration with the FL3XX web application.
To add an expense to your flight, simply go to the FBO, Transp., Hotac, Catering, or Post Flt tabs in the Crew App. At the bottom of the page, you'll see a bar and button labeled "Add Expense." Tap on this button to open the expense form. You can also see the total number of expenses already added for the flight, and if you click on it, you will see detailed information about each expense.
You can also add and manage expenses for duties and roster entries. You just need to open a duty, and at the bottom of the screen you'll see a bar and button labeled "Add Expense." This aligns with the capabilities available on the web app's Roster page, enabling users to create and manage expenses directly from the duties details screen in the mobile app. Expenses entered for duties are stored and associated with the specific duty or roster entry, ensuring data synchronization with the backend system for accurate record-keeping. Please note, roster expenses do not support offline mode and are only reimbursable to the Crew app user.

The feature to add expenses is only accessible and visible when the "Expense Tracking Enable" setting is turned on for the specific operator.
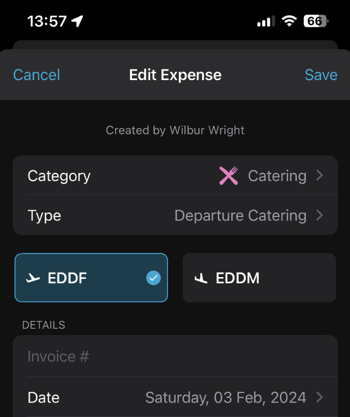
Filling Out the Expense Form: When filling out the expense form, you will need to choose the type of expense, enter the amount, and assign it to the appropriate category, which is now labeled as "Category" for better clarity. The best part is that the app automatically assigns the cost type based on the page you are on, ensuring that your expenses are categorized correctly without you having to manually input this information. Adding attachments to the expense is easy - you can either select files from your device or scan documents directly. The Crew App supports multiple attachments, allowing you to provide detailed expense reporting. Once you save an expense, it is immediately synchronized with the related page on the web application, maintaining consistency across all platforms.
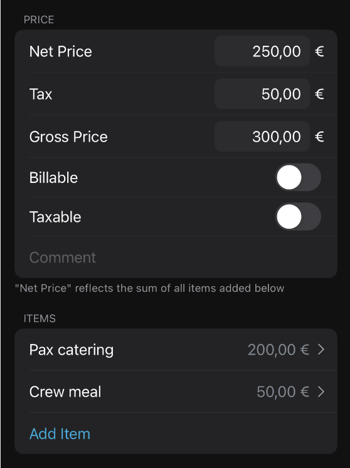
A new section called "Items" has been recently added to the Crew App. When you tap on the "Add item" button, a slide-up window will appear where you can enter all the necessary details about the item. Once you save an item, you have the flexibility to edit or delete it as needed. However, it's important to note that the "Save" button will remain disabled until the total price of all items matches the net price. This requirement is in place to provide clarity and ensure accuracy in expense reporting.
Unlike flight expenses, roster expenses do not include category items or icons on the expense screen.
If you want to learn more about managing expenses on the FL3XX app, we recommend checking out our article on How to Add a Trip Expense.
Understanding Locked Expenses in FL3XX
When you try to add an expense in the catering section of a trip in the FL3XX Mobile App and see an error, it may be because the expenses are locked. This is expected behavior and happens for two main reasons:
-
Invoice Transferred: The booking's invoice has been sent to an external accounting system, such as QuickBooks, which locks expenses to ensure accurate financial records.
-
Manually Locked by Sales: Your Sales team or admin has locked the expenses for the booking, often as part of your company's process.
When expenses are locked, you cannot add or modify them in the mobile or web app. This helps maintain consistency in your financial data.
What Should You Do?
If you need to add an expense to a locked booking:
-
Contact your Sales team or admin to unlock the expenses section for that booking.
-
Once unlocked, you can add expenses as needed.
Downloading flights for Offline and Airplane Mode
You have two methods for downloading single flights for offline use in the Crew app:
-
Click and open the flight: Each time you open a flight by clicking on the flight cell, the flight will be updated and downloaded automatically.
-
Swipe left and press 'Download': A status information bar will appear on the flight. To update the flight, you can click on 'Update'. To download the flight again, you can select "Download" or view the flight details stored on the local storage by clicking on the “Details” button.
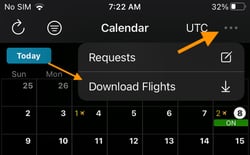
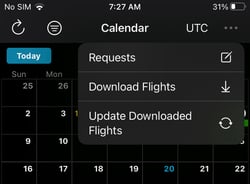
You can also download multiple flights by using the "Download Flights" option, which can be found by clicking on the "..." icon on the top right of the Calendar and Duties screens. This feature allows you to download and store flight information easily.
You have the option to quickly select flights for the next 24, 48, or 72 hours, or you can choose a specific date range in the future to download the flights you need. Please note that you cannot download past flights or more than 3 days.
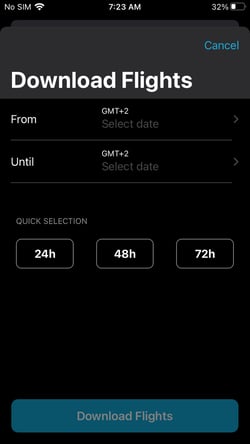
After selecting the flights you want to download and pressing "Download Flights," you will see a progress bar that informs you of the download status. Suppose you have already downloaded a flight using either the "Download Flights" option or the single download button. In that case, you will have the option to update all of your downloaded flights by clicking on the "Update Downloaded Flights" button. It's important to note that this feature only updates flights scheduled for today and in the future to prevent unnecessary resource usage.
If you decide to cancel the download of flights, it will only cancel the flights that are currently in the downloading queue. When you log out of the app or force-close the app on Android, all downloaded app documents and flight documents will be removed.
Additional information:
The download limit for flights is 30 on iOS and 10 on Android devices.
The offline mode feature allows you to access and use the app without an internet connection. All flight data is available for download, ensuring uninterrupted access to critical information.
With FL3XX's offline mode, you can access vital flight data even in areas with limited or no internet connectivity, ensuring a seamless experience and uninterrupted access to critical information.
Birthday Notifications
Recognizing the importance of personal touches, we've integrated a Birthday Notification feature into our mobile apps. This section will guide you through how this feature works, ensuring no passenger's special day goes unnoticed.
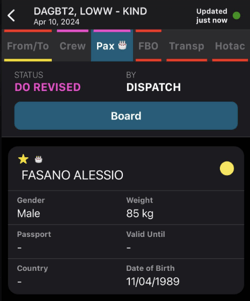
- Birthday Icon Display: In the Pax tab, a celebratory 🎂 icon appears next to passengers with upcoming birthdays.
- Pre-Birthday Notifications: Crew members receive notifications about an upcoming passenger's birthday X day(s) before the event, with X being adjustable within the Operator settings.
- Date Range Customization: Operator settings now include options for setting the birthday notification date range, with defaults of +7 to -7 days, and flexibility ranging from 0 to +9 days before and 0 to -9 days after the birthday.
- Display Control Settings: Administrators can control the visibility of birthday icons and messages, ensuring celebrations are in sync with company preferences and the passenger’s time zone. The feature is adaptable, allowing celebrations to be set for birthdays on the flight date or for N days before or after, according to the settings. As time zones change, so do the timing of birthday messages, icons, and animations, ensuring celebrations are always in the correct local time.
- Advanced Celebrations: When both +N and -N fields are specified, the advanced feature kicks in, displaying detailed birthday notifications in addition to the icons.
- When Fields Are Blank: The Pax birthday feature is disabled to prevent unnecessary notifications.
- Leap Year Consideration: For passengers born on February 29th, celebrations are shifted to February 28th during non-leap years to keep the festivities on track.
For more information on the Settings, please contact our support team.
Pax Previously Onboard Information
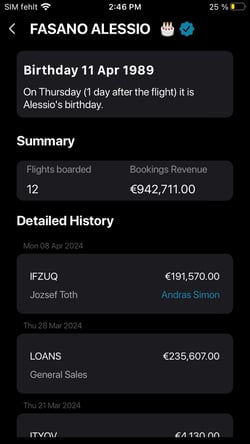
"Pax Previously Onboard Information" is a feature within our mobile application designed to offer users insights into the booking history and summary of passengers previously onboarded. This feature is crucial for personalizing the service and making informed decisions based on past bookings.
How to Access "Pax Previously Onboard Information"?
To access this information, the feature must be enabled within the Operator settings. Here's when and how different pieces of information become visible:
-
Enabling Pax Information Display:
- The "Pax Previously Onboard Information" becomes accessible when its setting is switched to true. This action allows the display of the summary section and booking history for each passenger.
-
Displaying Pricing Information:
- General Visibility: Pricing details are shown in the History section when the "Pax Previously Onboard Information" is enabled and the "Pricing Information Control" setting is adjusted to "ALL".
- Restricted Visibility: When the "Pricing Information Control" is set to "Only for Sales", pricing information becomes available exclusively to users holding any role with "QUOTE_QUOTE_READ" or higher. Users without such roles will see the Pax Previously Onboard Information without the pricing details.
Flight Release in Crew App
We display in the Crew App when a flight has been submitted to release or released.
Crews already receive a push notification when a flight has been released. We are improving the display of flights with the release status. Crews will see whether a flight has been submitted to release (in yellow) or has been released (in green).
Flight Release Status is:
- X - DO/Red
- S - REQ/Yellow
- Checkmark - OK/Green
- N - Private flight/Grey
Text Fields and the Bottom Sheet Editor
All text fields across the Crew App now expand to show their full content and open a dedicated editor when you tap them. Previously, fields were edited inline and could clip long text.
What changed:
- All text fields auto-expand to their full height when a screen loads — no content is cut off.
- Tapping an editable field opens a full-screen bottom sheet editor instead of editing inline.
- Read-only fields display full content but do not open an editor.
- Empty fields display at two-line height with placeholder text.
How to edit a field:
- Tap any text field (for example: Remarks, Notes, Catering Order, FTL Comment).
- A bottom sheet opens. Tap the text area to bring up the keyboard.
- Make your edits.
- Tap Done to save, or Cancel to discard.
- If you swipe down with unsaved edits, a prompt appears: Discard Changes or Keep Editing.
Field types:
- Editable: expands fully; tap opens the editor.
- Restricted (no access rights): expands fully; tap shows an "Access Restricted" message.
- Read-only: expands fully; tap is ignored.
- Empty: displays at two-line height with placeholder text.
Where this applies (Crew App):
FBO Remarks, Transportation Notes, Hotac Notes, Catering Order & Pax Remarks, Customs Notes, Migration Notes, Slot/PPR Notes, Permits Notes, FPL Remarks, W&B Remarks, FRAT Flight Mitigation, Fuel Notes, Tasks Description & Notes, MVT Notes, Post Flight FTL Comment & Journey Log Comment, HIL/MEL Add Defect Description, Release Remarks.
No operator setting required. Field editability is based on existing user roles and flight state.