
Web Application
Adding or amending passengers can be accomplished from any of the three pages (Sales, Dispatch, and Timeline) where a flight strip can be expanded.
Adding Passengers
- Select the flight strip for the flight that you'd like to add a passenger to
- Click on the PAX Cargo flight item to expand the panel
- Click on the Person field within the passenger section
- Type or select the name of the passenger that you would like to add
Deleting Passengers
- Select the flight strip for the flight that you'd like to add a passenger to
- Click on the PAX Cargo flight item to expand the panel
- Hover over the name of the passenger that you would like to delete
- Click on the 'X' located to the left of the passenger's name
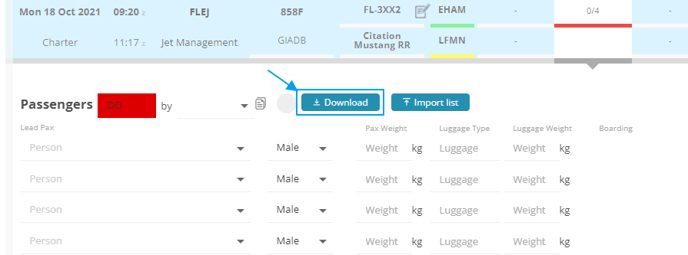
Adding Passengers In Bulk
- Select the flight strip for the flight that you'd like to add the passengers to
- Click on the PAX Cargo flight item to expand the panel
- Click on the IMPORT LIST button
- Select the file with the list of passengers that you would like to upload
- To obtain a .xlsx template, click on the Download button
- Columns colored in red are mandatory
- Orange columns are optional and to be used only when ID Type selected is P=Passport
- Review the list of passengers
 New passenger, not available in the system before, the passenger will be inserted in the system (salutation is automatically added by default based on the Gender column)
 An existing passenger in the system, all details are matching
 For existing passengers in the system, some details are different and will be updated
 Data in the file was not recognized or is incorrect
- Click IMPORT
NOTE: Only adding passengers can be done in bulk.
Available Fields in the Upload File
When uploading passengers in bulk, the following fields are available in the file/template:
- First Name (mandatory)
- Middle Name
- Last Name (mandatory)
- Gender
- Date of Birth
- Place of Birth
- State of Birth
- Country of Birth
- Nationality
- ID Type
- ID Number
- Country of Issue
- ID Expiry Date
- Visa Number
- Visa Country of Issue
- Visa Expiry Date
- Weight
- Unit
Minimum Required Fields:
- First Name
- Last Name
Special Notes:
- The Date of Birth field is no longer mandatory for passenger imports. If an operator uploads a passenger list containing only First and Last names, the system will treat these passengers as NEW by default.
- The fields Visa Number, Visa Country of Issue, and Visa Expiry Date can only be used when the ID Type selected is P (Passport).
Ensure that the file/template is formatted correctly, with the mandatory fields filled in and optional fields completed as necessary. Please use the dropdown lists (DDL) whenever available, and adhere to any specified formats in the areas indicated. This will facilitate a smooth import process and accurate passenger data entry.
Automated Removal of Temporary Passengers
New Pax Import Auto Delete [1] is a setting that allows operators to automatically remove newly imported passengers after a flight.
When enabled, any passenger uploaded via the bulk import feature — who is not matched to an existing record in FL3XX — will be marked for auto-deletion. These passengers will be deleted 3 months after PostFlight is set to OK. If PostFlight is reopened, the countdown resets.
This feature is particularly useful for operators with local airline-type operations, where most passengers are one-time travelers, and there is no need to retain statistical data for each individual. 
Mobile Applications
Users with access to the FL3XX Crew mobile applications can add or delete individual passengers from a flight using the boarding feature.
Adding Passengers
- Click on the 'Schedule' Page
- Select the flight for which you'd like to add and create a new passenger to
- Select the 'Pax' flight item within the flight overview page
- Click on the 'Boarding' button
- Click on 'Add new passenger'
- Enter the name of the passenger in the search bar.