
Automatic GOVlink - PNRGOV Submission
Manual GOVlink - PNRGOV Submission
Automatic Sanction List and Travel Authorization Checks
PNRGOV by Streamlane
PNRGOV by Streamlane automates the submission of passenger and crew data to government authorities for compliance with international regulations, ensuring secure and timely transmission. For more information regarding this regulation visit the EU's Directive on the Use of Passenger Name Record (PNR) here.
Demo
How It Works
1. Automatic PNRGOV
Submitting PNRGOV to governments has never been easier: Upon clicking a button, FL3XX sends the flight and passenger data to GOVlink, which then automatically redistributes it in a timely manner to meet the legal requirements.
Initial Submission and Update
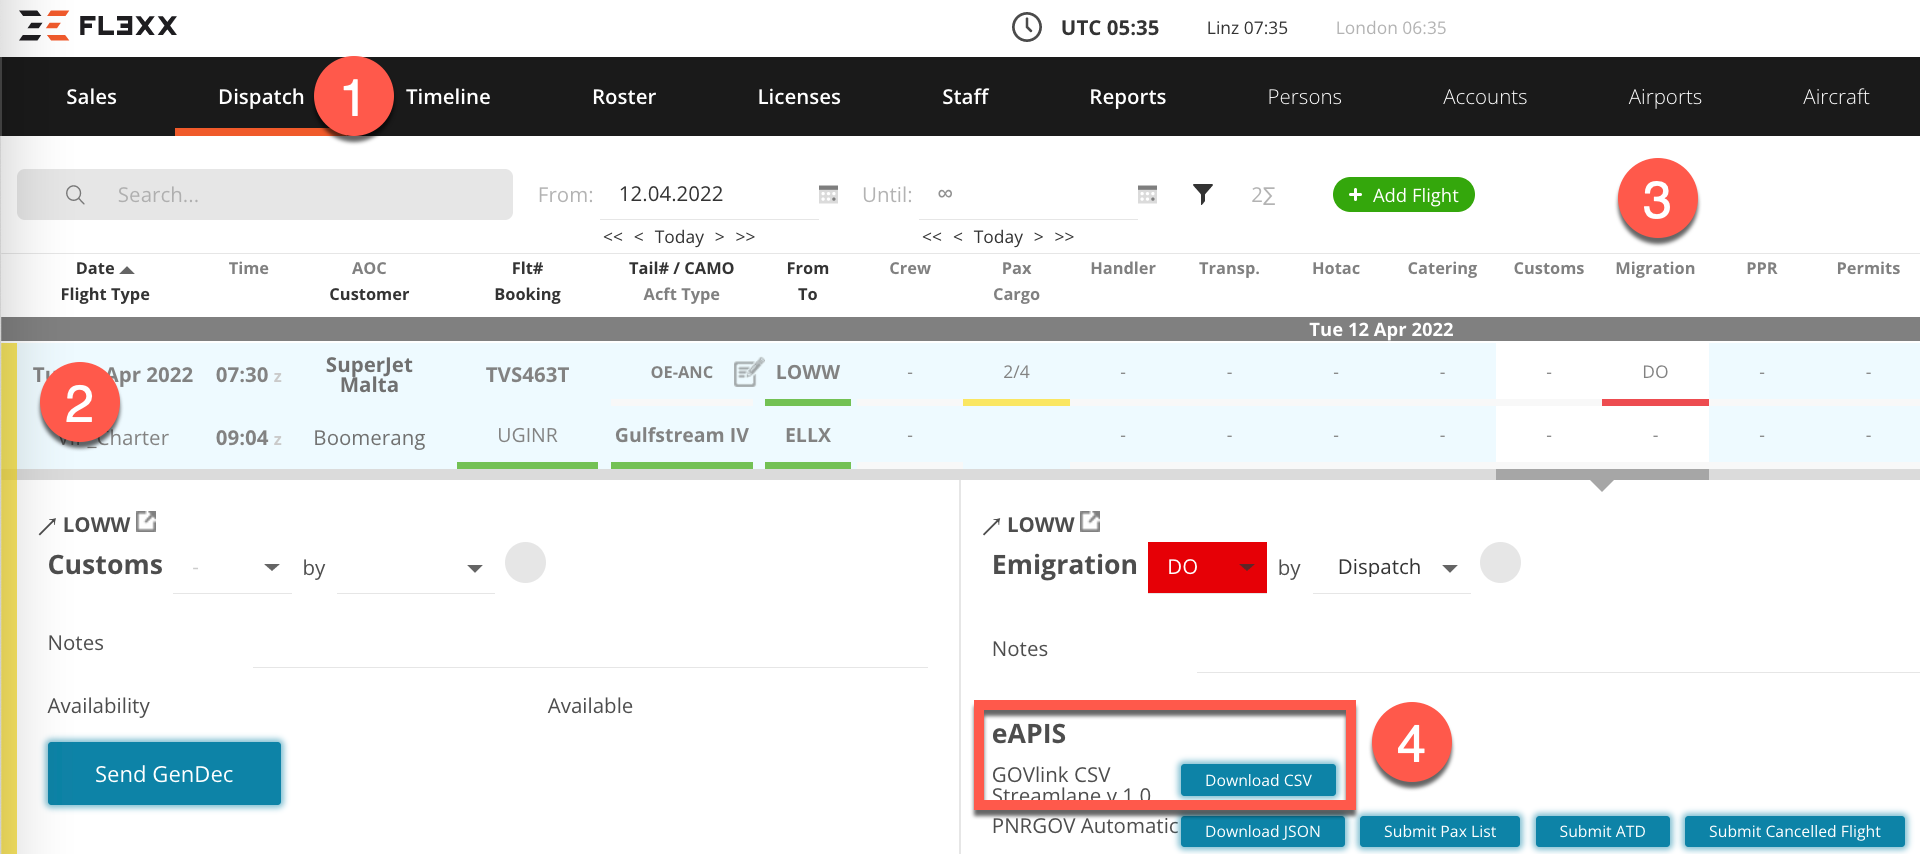
- Go to the Dispatch module
- In the desired flight, open the Migration panel
- If the flight is subject to PNRGOV, you can see the "PNRGOV Automatic" function. Either in the departure or arrival section, depending on which destination is subject to PNRGOV. If both are subject to PNRGOV, only in the departure section (once per flight)
- Pressing the button "Submit Pax List" sends the flight and data to GOVlink
- (Optional) FL3XX offers enhanced automation with additional eligibility checks at 60 hours and 3 hours before the estimated time of departure (ETD). To enable this feature, please contact support@fl3xx.com.

Additional Information
- Flights should be submitted at least 48 hours before its scheduled departure.
- The submission should be updated shortly before flight departure by pressing Submit Pax List again.
- FL3XX tracks and saves the submission history (see the screenshot below).
- You can also download the text file with the flight and passenger data to see what exactly has been submitted to GOVlink. This may be practical, may there be a dispute – e.g. a missing passenger in data submitted a month ago. You can easily find the flight, and download the text file to recognize which passengers were sent to GOVlink.
-
The Private or Commercial Type of Flight is determined by the Type of Flight field found in the FPL panel on the Dispatch Page. This field is automatically assigned based on predefined workflows but can be manually adjusted for individual flights.
-
N and S – Commercial flights
-
G, M, and X – Private flights
-
-
-
If left blank – The type is taken directly from the associated workflow
-
Special case - Ambulance flights:
Flights with the Workflow Type "Ambulance" and the Type of Flight "X" are treated like Commercial flights. Flights with any other Workflow types with Type of Flight "X" are treated as Private.
-
To manage dual passport submissions for GOVlink, navigate to Dispatch, PAX/Crew, click the book icon, and assign the appropriate Arrival ID."
-
All submissions are disabled for flights assigned to “dummy” aircraft to ensure data accuracy. A message will be shown in GOVlink stating: “Submissions are disabled for Dummy Aircraft."
-
If passengers have already been added to the flight, but their passport details were entered afterward, please remove them from the flight in Dispatch and re-add them. This will ensure the passport information is correctly loaded and sent to GOVlink.
- Submissions may be disabled if any mandatory information is missing for at least one passenger (PAX) or crew member. The missing details may include:
- missing document number
- missing document expiry date
- etc.
-
AOC → [Your AOC] → Flight Prefix must be filled in and must match the flight number of the flight you want to submit to GOVlink.
- Provider contacts are configured in:
- Phone number and fax: Settings → Dispatch → Dispatch Email Attachments & Recipients
- Email: Integrations -> APIS / CBP / TSA -> Emergency Contact Email
TIP: Benefit from using the status checkbox of the Emigration/Immigration panel – OK/red, REQ/yellow, and OK/green – to track the PNRGOV status.
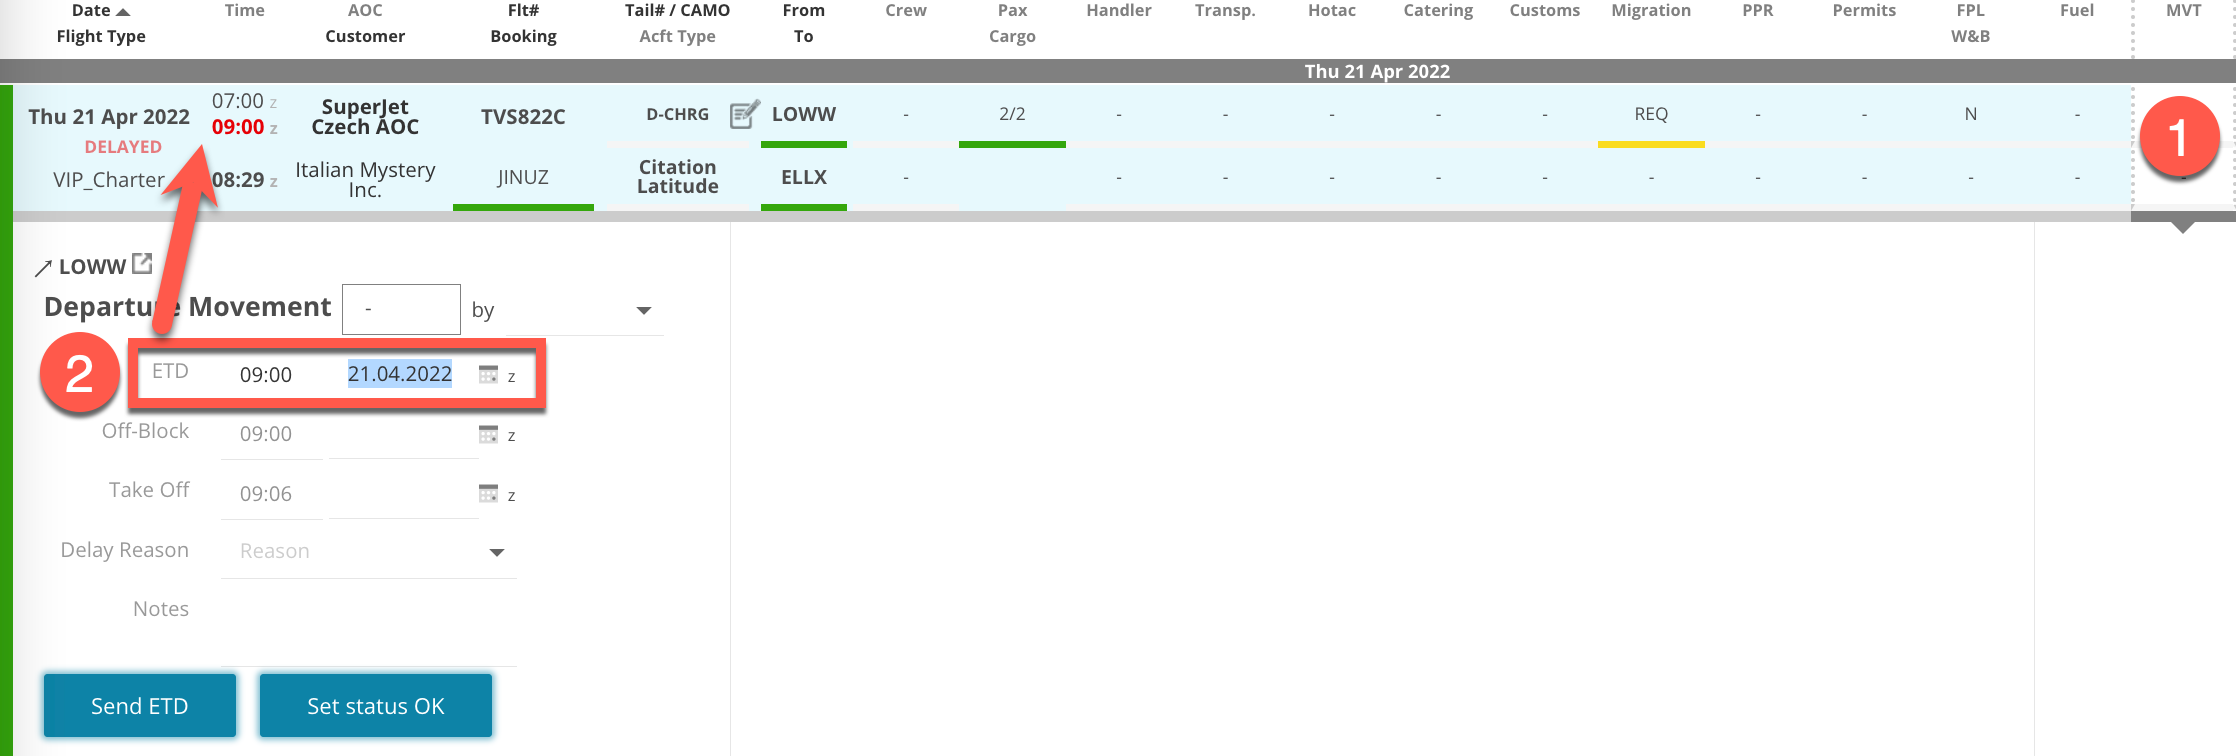
Delayed Departure
If the given flight is delayed (e.g. passengers coming late), you can easily update the flight in GOVlink:
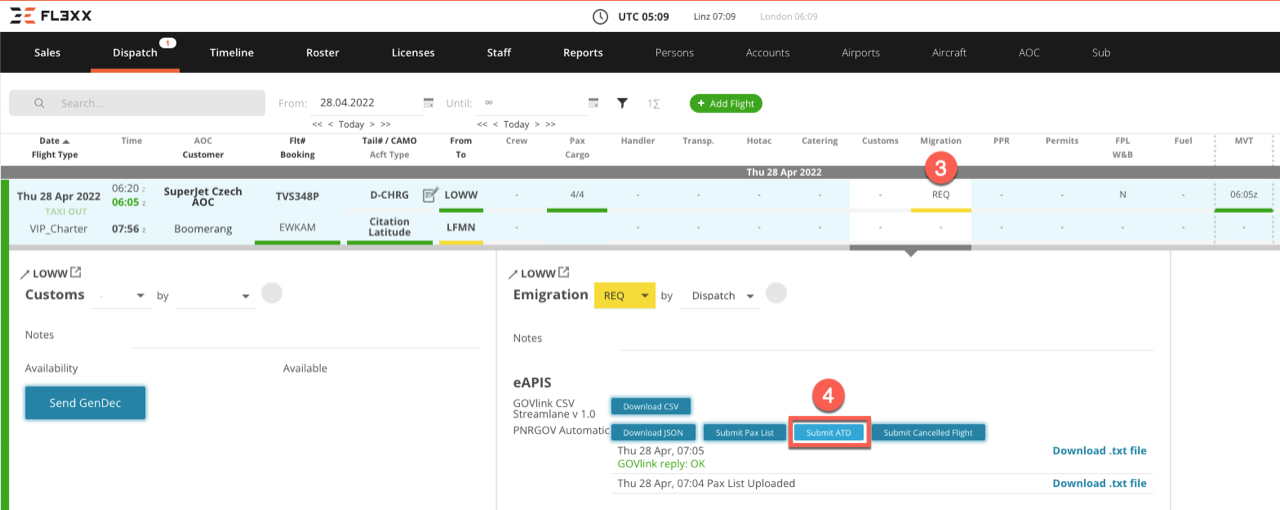
- Go to the MVT panel in the given flight
- Insert the new Estimated Time of Departure (ETD)
- Go to the Migration panel, and press the button "Submit Pax List". This action updates the GOVlink accordingly so that the system can automatically inform the authorities of your new ETD timely.
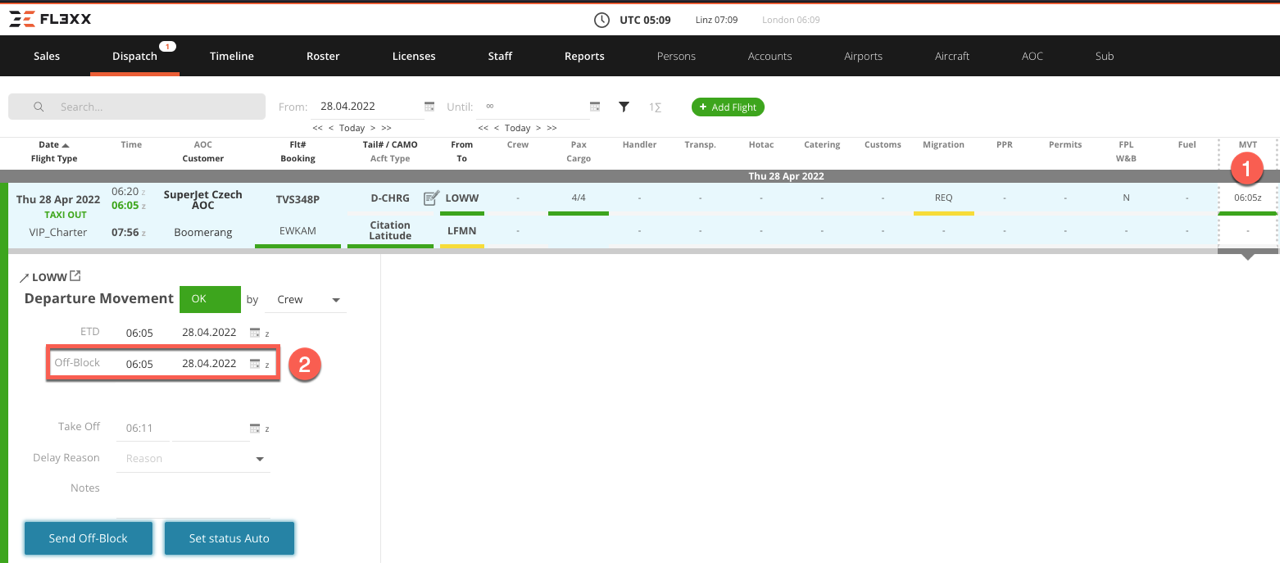
Actual Time of Departure
Depending on your settings in GOVlink, you may need to update GOVlink with the actual time of departure for each flight:
- Go to the MVT panel
- Insert the Off-Block time and the Take Off time
- Go to the Migration panel
- ATD message will be sent automatically
If your GOVlink setup is based on the ETD (i.e. GOVlink considers ATD = ETD), you don't need this function.
Cancelled Flight in GOVlink
After the flight which is subject to PNRgov is canceled in FL3XX, and the PAXlist was submitted to GOVlink, the cancellation message will be sent automatically
2. Manual PNRGOV Submission (JSON File)
There is a manual option to submit the passenger data manually in FL3XX. FL3XX can generate a JSON file (recommended), which you can import to GOVlink. Thus, you needn't create and update flights and their data in GOVlink manually, substantially saving you time from double work and minimizing errors.
First, generate JSON in FL3XX:
- Go to the Dispatch module
- Select the flight
- Click on Migration to open this panel
- Click on 'Download JSON' within the panel labelled eAPIS / GOVlink JSON
NOTE: The JSON file can be only uploaded to GOVlink if it contains at least one passenger. GOVlink doesn't import empty flights using this method.
Then, import the JSON in the GOVlink Portal:
- Go to your GOVlink portal.
- Log in with your GOVlink credentials provided by Streamlane
- Click on the green ‘Upload’ button with the paper clip icon
- Make sure that the JSON option is chosen on the scroll menu
- Upload the JSON file that you downloaded from FL3XX to create or update the flights with passenger data

Countries (regions/organizations) supported via Streamlane's GOVlink:
|
EU:
|
Outside of the EU:
|
EES (Entry/Exit System)
Streamlane simplifies compliance with the EES (Entry/Exit System), ensuring your operations meet the latest EU regulations for managing passenger data when entering or leaving the Schengen Area. The integration automates the submission of required information, reducing manual effort and ensuring accuracy.
How It Works
- Once your passengers are added to the flight, FL3XX and Streamlane automatically determine which compliance checks are needed.
- Streamlane then pulls the passenger and crew details and performs the necessary checks in the background, without disrupting your workflow.
- With 2-way integration, results are sent directly back to FL3XX and displayed using a clear traffic light system (red, yellow, green) for easy visibility.
Sanction List and Travel Authorization Check by Streamlane
The Sanction Check feature powered by Streamlane is important for ensuring compliance with international regulations and maintaining aviation safety. This feature allows users to check if passengers on their flight manifest are on the sanction lists issued by EU, UK and USA.
For more information about this service, visit Obligations of Air Carriers regarding Sanction lists.
The travel authorization screening, powered by Streamlane, helps ensure compliance with international entry-regulations
How It works
A prerequisite to benefit from this service is to subscribe to Streamlane. Depending on your subscription with Streamlane, this function can work in one of the following ways:
-
Automatic:
- Sanction List screening and Travel Authorization screening are automatically conducted whenever you submit the PAX List to GOVlink.
- Passport and related Visas need to be inserted in FL3XX.
- As a result, you will receive answers in a form of a traffic light with relevant comments when hovering
- To activate, go to Settings -> Configuration:
- Enable Travel Authorization in Dispatch
- Enable Sanction Lists in Dispatch

-
Manual (only for Sanction List):
- In Dispatch, in the PAX panel, press "Check Sanctions" button to send pax and crew data for screening.

- You will receive results by email to your inbox, which you set up with Streamlane.
- In Dispatch, in the PAX panel, press "Check Sanctions" button to send pax and crew data for screening.
Activation
Please contact the FL3XX Customer Success team at support@fl3xx.com to enable this integration.