Setting up a FRAT Table in Settings
Setting up the General part of FRAT in Settings
- Go to Settings → Dispatch → Flight Risk Assessment Tool (FRAT)

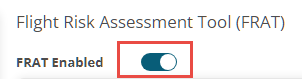
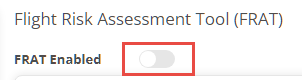
- DO NOT activate the FRAT until you have the full setup of the table.
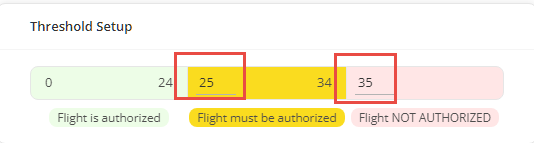
- The first step is to determine the thresholds according to your operational manual. In order to do this, add the threshold number for the yellow and the red sections. When the flight's status is YELLOW, you will need an approval from an authorized person to operate the flight. If the status is RED, not authorized, you either mitigate the potential risks, or do not operate the flight.
Adding the Notification Settings to FRAT
- Select in case of which status the system should send a notification email to the Approvers. You can only send notifications when the status of the FRAT is in "Flight must be authorized" status, "Flight not authorized" status, or in both cases.
- Activate the notifications by setting the toggles to active.
- Add unlimited number of email addresses to each notification.
- An email will be sent in all cases when the related threshold is exceeded.

Setting up a Manual FRAT Table in Settings with Line by Line Mitigation
- The next step is to setup the FRAT table. You can create a Category, add individual Items within that Category, and for Items that involve multiple choices, you can include Sub-items.
- Add a Category:
- Click on the 'Add Category'.
- Name the Category item.
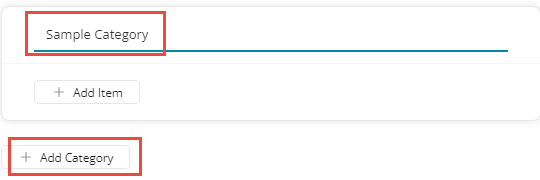
- Add Items within a Category:
- Select "Add item".
- Add the name of the item, the related score and the mitigation score (the initial mitigation score is editable in Dispatch allowing you to change it during the FRAT calculation on a flight if required).
- If you have multiple single items in a Category then select again "Add item".

- Add Sub-Items within an Item:
- Add an Item as described above.
-
- Select "Sub-Item" and add the first one, such as RWY Cross Wind < 30kt, add the related score and the mitigation score.
- Select "Add Sub-Item" again and add the description such as RWY Cross Wind <50kt.
- You can add as many Sub-Items as many needed.

- Repeat the above actions with more Items if needed.
- Once you setup the entire table and any time in between, you can save it using the top right "Save" button.
Cancelling Categories, Items and Sub-Items, or moving them within the table:
-
- You can delete all three categories anytime, however we would suggest not to make significant changes after the FRAT tool is activated. To delete any of the three categories, select the bin on the left side that appears on hover.
- If you delete an Item that has Sub-Items, all Sub-Items will also be deleted. If you delete a category, all items and sub-items will also be deleted.
- If you need to reorganize a category, on the left side you can drag and drop items and sub-items.

Setting up the Automated FRAT Items
Below is the description of each item that can be auto-calculated in Dispatch. There are 13 items for which the system has the data to auto-calculate the related FRAT scores. Below we detail each one, how they work, and how to setup them up.
- General setup applicable to each item:
- If you would like to use an Item, switch the toggle on.
- To display the automated item in the Dispatch FRAT table, select the appropriate category in under which it should be displayed. For example the RWY Length should be under the Airport Category.
- The Automated items can be:
- No Choice Items: Items such as Night Operations, NON-US Airport, Single Pilot Operations, or Open HIL/MEL Item. These Items can only be activated and the system calculates the related score.

- Single Choice Item: There is only one such item, the "Flight Operations Between" Item. In this case add the hours in between you would like to calculate a related score.

- Multiple Choice Items: For all other items you can add multiple Sub-Items and the system will pick the one that matches the system data.
- No Choice Items: Items such as Night Operations, NON-US Airport, Single Pilot Operations, or Open HIL/MEL Item. These Items can only be activated and the system calculates the related score.

-
- Setup the Items:
- Add the Score and the Mitigation score to a no choice item.
- Add the values and the Score and the Mitigation score to a single choice item.
- Add the Sub-Items to a multiple choice item, add the related score and mitigation score.
- Setup the Items:
- Automated Items and the logic how they are calculated
- RWY Length: The calculation takes the longest RWY of the arrival airport into account, and compares it with the values you have added. If the value falls below any of the Sub-Items that you have added, a score will be assigned.


- Short Crew Notice: The calculation for this item is triggered when the status of "Assign" is changed to "OK," as this is the moment when the pilot receives a notification of the flight assignment. The calculation is based on the time between the status change and the flight's ETD. The FRAT score will be assigned accordingly.
- RWY Length: The calculation takes the longest RWY of the arrival airport into account, and compares it with the values you have added. If the value falls below any of the Sub-Items that you have added, a score will be assigned.


-
- Open HIL/MEL Item: if there is any HIL/MEL item open in the Aircraft / Maintenance section, the related score will be auto-assigned.


- Low Pilot Flight Hours on Type: this is a complex calculation based on the assigned pilot to the flight Flight Hours. The data is collected from the Staff page / Pilot Flight Hours / By Type section. Please note that the Pilot must have an Assignment to the Aircraft Type and a By Type / Type Rating value added. This includes the initial hours during the setup of the pilot and also any cumulated flight hours on post flights.

- Open HIL/MEL Item: if there is any HIL/MEL item open in the Aircraft / Maintenance section, the related score will be auto-assigned.

-
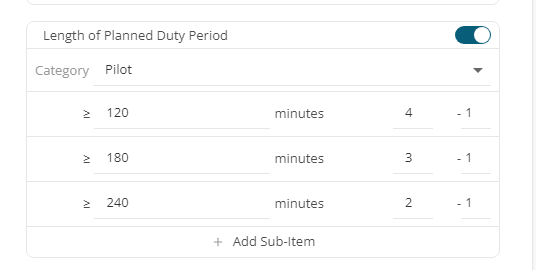
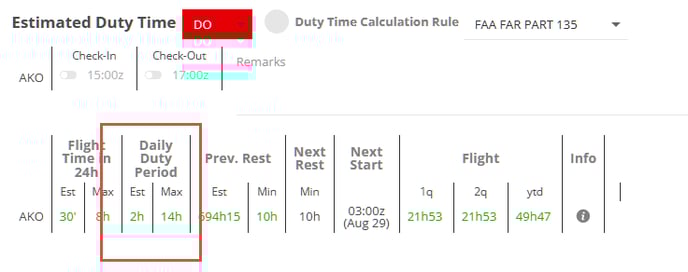
- Length of Planned Duty Period: This calculation is based on the cumulative Duty Times within one Duty Period. If the pilot is assigned to three flights within one Duty Period, each flight's FRAT will show a score, based on the total Duty Time within the one Duty Period.
-
- Length of Planned Flight Time: This is calculated in the same way as the Duty Period calculation, except in this case the calculation is based on the cumulative Flight Hours within a Duty Period.


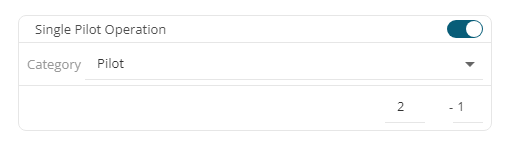
- Single Pilot Operation: if only one pilot is assigned to a flight the system calculates the related score.
- Length of Planned Flight Time: This is calculated in the same way as the Duty Period calculation, except in this case the calculation is based on the cumulative Flight Hours within a Duty Period.
-
- NON-US Airport (for US Operators Only): This item applies for US based operators only who would like to assign a risk score in case of International flights. If the Arrival, or the Departure airport is not a US, Puerto Rico, US Virgin Islands, or Guam airport, a related score will be added.

-
- Legs Per Duty Period: when this item is active, the Duty Period of a pilot is taken into account and the number of flight legs the pilot is assigned on is calculated. The Duty Period might have flight legs from different bookings.

- Time Zone Change: The values are based on the Time Zones of the Departure and Arrival Airports. When the difference is greater than the assigned value, a risk score will be added.

- Flight Operations Between: Please note that there is a second automated item that does almost the same calculations called Night Operations. You can use the "Flight Operations Between" item if you do not want to use the Night Ops item. We recommend not to use the two together, because in most cases this will result in double calculation of the same time frame.
- You can set the times from/to and a related score will be assigned if:
- The flight's ETA is after the start time.
- The flight's ETD and ETA is between the selected times.
- The flight's ETD is before the end of the selected time frame.

- Night Operations: similar to the above calculation, but in this case the Night Time Calculation setting is taken into account and the score is determined by the FAA, or EASA rules, based on the local times of the DEP, or ARR Airport.
- The calculation rules are the same as above.

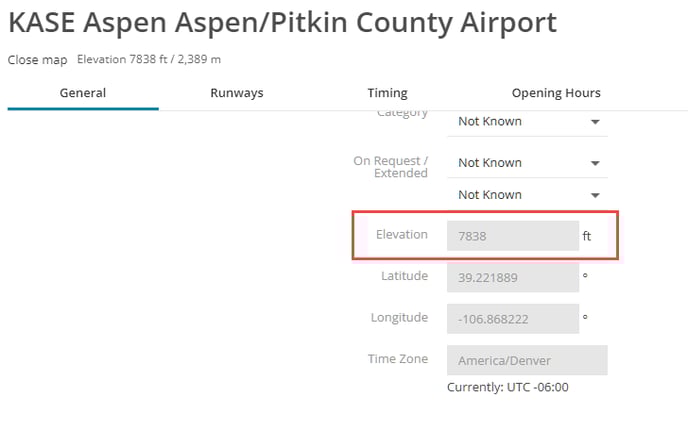
- Runway Elevation: Based on the Arrival Airport Elevation value with scores assigned accordingly.
- Legs Per Duty Period: when this item is active, the Duty Period of a pilot is taken into account and the number of flight legs the pilot is assigned on is calculated. The Duty Period might have flight legs from different bookings.

- Once you are satisfied with the table, you can activate the FRAT tool by switching the "FRAT Enabled" toggle on.